
by David Peterson
If your images always turn out all blurry, it may mean your lens needs a clean. Most high end cameras come with threads to which you can attach a SkyLight (or UV) filter. This helps to protect the lens from not only dirt, but scratches. Cheaper cameras don't have threads so remember to cover the lens when not in use and try not to touch it.
Don't clean the lens too often - depending on how often you use your camera, every few weeks or few months is fine. To clean your lens, pick up a lens cleaning kit from your local photo store. Use the lens brush and air blower to remove any loose clinging particles. Place a drop of lens cleaning fluid onto some lens tissue (or a cloth) and wipe the lens clean with a circular motion. Use the blower to dry the lens, or let it dry naturally. Don't use any abrasive solution (such as soap) or wipe too hard on the lens as you can wipe away the special coatings.
Watch out you don't create a 'worn spot' by cleaning your lens the same way each time. Alternate the circular motion with up and down or sideways movements sometimes.
Ensure you protect the other parts of your camera as well. Particularly the Memory Card slot and Battery contacts. If you find they have any corrosion, you can remove it easily with a pencil eraser. Make sure you remove the excess eraser that can get left in the compartment with an air blower. Never ever insert anything into the memory card slot that isn't meant to be there, as you could break the small pins. To keep clean, it's best to leave a memory card in the slot, or at least keep the cover closed.
Clean your Camera
ISO EXPLAINED

You are probably familiar with ISO on film used in a film camera. It's the 'speed' of the film - higher ISO values mean you can take photos in lower light.
But what about in the digital world?
Surprisingly, there is an ISO setting on your Digital camera. And although there is no longer any film, the ISO setting still plays a vital role.
ISO indicates your digital camera's sensitivity to light. The higher the number, the less light is needed to take a photo that is bright enough (correctly exposed).
In bright light (like the middle of a sunny day), you'll normally use ISO 50 or ISO 100. These are the lowest settings and can be used because there is lots of light around.
However, in lower light, your camera needs some help. There are two ways of doing this:
Decrease Shutter Speed
With a slower shutter speed, the camera has more time to 'take in' the amount of light it needs. Unfortunately though, the slower the shutter speed, the more chance that your images will turn out blurry.
Increase ISO
Rather than decrease the shutter speed, you can increase the ISO. As I said above, this will increase the sensitivity of the camera which means you can get the same shot with less light entering the camera. Thus the shutter speed can be kept low enough to avoid blurry images.
As increasing the ISO will increase the shutter speed, a high ISO will also help when taking fast moving sports shots. You'll get clear, crisp shots with no blur.
However, I still recommend you use the lowest ISO possible. Why?
Problems of using a high ISO
Using a higher ISO means the camera has less light to work with. Unfortunately this also means that 'noise' is introduced into your camera. If you'd like to find out exactly what noise is and how to eliminate it, check out the free bonus on noise that comes with my Digital Photo Secrets book.
Your camera's highest one or two ISO values will produce a lot of noise in your image, so I suggest avoiding them unless the light is so low that you have no other choice.
Auto ISO
Fortunately most of the time you don't need to worry about selecting the correct ISO. Most cameras have an "Auto ISO" setting. With Auto ISO, the camera will look at the amount of light in the scene and change the ISO appropriately so that the shutter speed doesn't get too slow.
ISO Values
If you choose to use a manual ISO, what values should you use?
ISO 50-100. Suitable for bright light (like outdoors on a sunny day.
ISO 200. Great for overcast or cloudy days. However on budget cameras some noise will be seen in your image.
ISO 400 and above. Use for indoor or night shots (even if you use a flash). Also useful to freeze the action in sports shots. These values will produce the most noise.
Noise in digital cameras is a huge problem, and one we'll have to live with for a while. Find out what causes noise, and how to avoid it with a brand new free bonus that comes with my "Digital Photography Secrets" book. I even show you how to use a leading noise reduction program to fix noisy images you've already taken!
Taken from : Digital Photography Secrets
by Davide Peterson
(www.digital-photo-secrets.com)
Apa Itu Aperture

Aperture berfungsi untuk mengawal kemasukan cahaya. Ia perlu diselaraskan untuk mendapat lubang atau saiz yg dikehendaki. Saiz-saiz aperture ini diukur dalam nombor 'f' atau 'f stop'.
Saiz aperture yg kecil membenarkan hanya sedikit cahaya memasuki kamera (melalui lensa) berbanding dengan aperture yg besar. Setiap nombor 'f' disusun dalam bentuk atau bidang skala aperture 2, 2.8, 4, 5.6, 8, 11, 16. Semakin besar nombor 'f', semakin kecil saiz bukaan aperture.
Apabila kita menukar dari f/4 ke f/5.6 atau f/5.6 ke f/8, cahaya yg memasuki kamera adalah separuh (1/2) dari cahaya nombor 'f' yg sebelumnya. Pertukaran ini adalah dari saiz aperture yg besar ke saiz aperture yg kecil. Penukaran dari saiz aperture yg kecil ke saiz yg besar adalah sebaliknya. Bidang skala aperture adalah berbeza antara sebuah lensa dengan lensa yg lain. Lazimnya, perbezaan ini bergantung pada harga dan model lensa serta kamera.
Pertukaran dari f/2 ke f/16 akan mengecilkan saiz aperture. Secara tidak langsung, cahaya yg memasuki lensa akan berkurangan.
Penggambaran ditepi pantai atau dibawah cahaya matahari terik memerlukan saiz aperture yg kecil (f/16 atau f/22). Ini bermakna untuk menahan cahaya yg berlebihan dari masuk ke dalam kamera, kita perlu mengecilkan saiz aperture. Apabila keadaan cahaya kurang atau di dalam bilik yang agak gelap, besarkan saiz aperture (f/2.8 atau f/2) untuk membolehkan lebih banyak cahaya memasuki lensa.
Mengelirukan? Selamat berfotografi!
Apa Itu Shutter Speed

Bagi beginnerz yg nak tahu apa itu Shutter Speed dan kegunaannya, saya perturunkan disini secara ringkas untuk menambah pengetahuan anda.
Shutter speed bermakna sebanyak mana cahaya memasuki kamera mengikut kadar masa atau kelajuannya. Kelajuan yg pantas akan membenarkan sedikit cahaya memasuki kamera dan boleh memberhentikan atau mengkakukan sesuatu pergerakan. Kelajuan yang lemah atau kurang, akan mendedahkan lebih banyak cahaya. Tapi ia tidak sesuai utk mengkakukan sesuatu pergerakan kerana kelajuan itu akan mengaburkan pergerakan objek tersebut. Sekiranya anda mahu memberhentikan larian seorang atlit, penunggang basikal atau apa saja objek yg bergerak, gunakan kelajuan yg pantas atau tinggi seperti 1/500 atau 1/1000 saat. Kelajuan pantas sebegini juga boleh membekukan percikan air atau kereta F1 di atas trek. Sebaliknya jika mahukan kesan khas pada gambar anda, gunakan kelajuan yg rendah seperti 1/50 atau 1/30 dan seterusnya. Kelajuan perlahan juga sesuai utk melakukan kaedah "panning", dengan mengambil gambar mengikut arah pergerakan subjek. Ia juga sesuai untuk mengambil gambar di waktu senja atau malam.
Selamat mencuba & selamat berfotografi!
RAHSIA 16
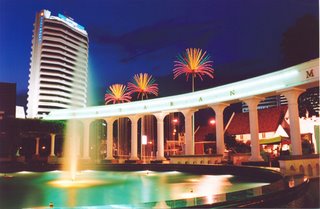
PENGGAMBARAN WAKTU MALAM
Waktu malam juga mempunyai keindahannya yg tersendiri. Seperti penggambaran pada waktu siang, penggambaran waktu malam juga mempunyai teknik-teknik yang tertentu untuk menghasilkan gambar yg menarik dan indah.
Untuk mengambil gambar di jalanraya yang terdapat lampu kereta yg sedang bergerak, dicadangkan anda utk setkan kombinasi dedahan ke f5.6 dan kelajuan shutter selama 20 saat.
Jika hendak mengambil gambar bulan penuh, setkan dedahan aperture kepada f5.6 dan kelajuan shutter 1/500 dengan menggunakan ISO 100 atau 200. Masa terbaik untuk mengambil gambar waktu malam ialah semasa matahari baru saja terbenam tetapi menampakkan sedikit warna dilangit. Jika di awal pagi, cahaya yang baru menyelinap keluar bercampur dengan kabus boleh menimbulkan suasana mistik. Teknik silhouatte juga mudah dihasilkan pada waktu subuh atau senja. Penggunakan tripod amat digalakkan untuk penggambaran begini untuk mengelakkan gegaran atau goyangan pada kamera.
Cahaya yang datang dari banyak sumber seperti lampu jalan, lampu kalimantang, mentol, lampu kereta, lampu bangunan dan sebagainya memberi efek yang berbeza pada kamera anda sekaligus menjadikan gambar anda lebih menarik.
Bagaimana dengan permainan bunga api di KLCC yang di sambut semasa malam kemerdekaan, sudahkah anda cuba untuk merakamkannya. Kerana dengan kombinasi kelajuan shutter dan aperture yang betul, ia boleh menghasilkan gambar percikan yang sangat mempesonakan. Cubalah...
Selamat Berfotografi...
